Facilitating STEM activities for fifth graders can be nerve-racking, mainly because STEM is relatively new. Some STEM activity resources provide too little information while others have so much information that it gets confusing. Resources with too little information force you to figure the rest out, hoping it’ll turn out OK. The resources with too much information can be confusing. They usually try to point out all the Next Generation Science Standards and Common Core points covered for a span of grades. This makes activities seem more tedious then they have to be, leaving you to think twice about implementing them.
STEM education is an integrated approach to teaching science, technology, engineering, and math. While some people may say STEM activities must be hands-on learning, we must remember that the goal of STEM is to prepare a future workforce. So, STEM activities for fifth graders do not all have to be hands-on, but we must make it a goal for the STEM activity to reinforce concepts and provide a solid foundation for life-long learning.
To simplify things, I created this page to include projects that I have done in a library program setting and aren’t too difficult to facilitate but still effective in advancing STEM learning for fifth graders. Each activity includes a materials list, a description, STEM content (I try not to get too into NGSS or Common Core covered), and what to say and ask.
Table of Contents
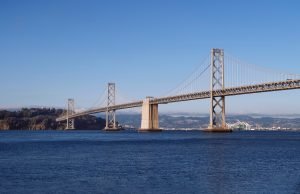
Tacoma Narrows Bridge Design Discussion
Materials
- jump-rope
Description
Many STEM activities are hands-on and require a lot of materials. This one isn’t any of those, but it is just as fun and actively engaging to students. This is also ideal for low-budget teaching situations.
In physics, resonance is the amplification that occurs from when the frequency of a periodically applied force is in harmony with the natural system it is affecting.
The Tacoma Narrows Bridge, located in Washington state, opened to traffic on July 1, 1940, and collapsed only four months later on November 7, 1940. This one and a half minute silent video shows the bridge’s “spectacular” collapse:
https://www.youtube.com/watch?v=Bcw1BP1t-Iw&app=desktop
How To
- Show students the YouTube video.
- Use a volunteer to hold the other end of the jump-rope or tie it around a chair leg.
- Discuss how the movement in the bridge is like a jump-rope when you move the ends up and down to create waves.
- After explaining that the wind caused waves to tear the bridge apart, ask about how to build the bridge again so that there are fewer waves.
The science/physics of ‘resonant frequencies of waves’ may be at a more advanced level for fifth graders. It is suggested to use fifth-grade wording – that what caused a massive amplitude of waves in the bridge was energy from the wind being just the right “wavelength.”
Science Content
This STEM activity for fifth graders aligns with three Next Generation Science Standards:
4-PS4-1: “Develop a model of waves to describe patterns in terms of amplitude and wavelength and that waves can cause objects to move.”
3-ESS3-1: “Make a claim about the merit of a design solution that reduces the impacts of a weather-related hazard.”
3-5-ETS1-3: “Plan and carry out fair tests in which variables are controlled and failure points are considered to identify aspects of a model or prototype that can be improved.”
Engineering Content
The failure of the Tacoma Narrows Bridge resulted in the creation of the engineering discipline of aerodynamics.
As students observe the effects of natural hazards, they can learn that we can take steps to reduce the impact of these natural processes through engineering design.
Use this activity as a unit starting point, as the Tacoma Narrows Bridge collapse was a starting point for the study of aerodynamics. Students can be actively engaged in learning the engineering design process to study bridge building designs and how bridges can be improved through planning, testing, and redesigning.
What to Say and Ask
- What caused the movement in the bridge?
- How did the bridge move? Why caused the bridge to fall?
- What could have caused the bending and twisting of the bridge?
- What caused the ‘waves?’ How could an engineer reduce waves on a bridge?
- How does the design of this bridge compared to a similar bridge you have seen?
- How do engineers use this video to rebuild and improve a new bridge?
Source
https://ngss.nsta.org/Resource.aspx?ResourceID=770
Coastal Engineering Activity

Materials
-
- towels
- ruler
- rosemary sprigs or other objects to represent vegetation
- small building blocks or other waterproof objects to represent houses
- assortment of small rocks
- toothpicks
- sand
- paddle or other object to displace water
- water
- flat wave tank or large flat plastic bin
- camera (optional)
- metronome or other sound recording device (optional)
- computer program to analyze beach area on pictures (optional)
- protractor (optional)
Description
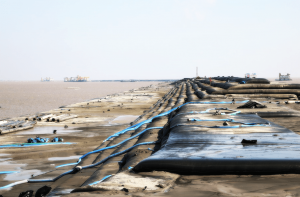
In this activity, fifth graders learn about coastal erosion and the role engineers play in protecting shorelines by using the engineering design process to come up with ways to lessen erosion. Public concerns are also taken into account and use both structures and policies.
In Shore Savers, students can relate to their knowledge of the damage that was done by Hurricane Katrina or Hurricane Sandy. To engage students in this phenomenon, Coastal Engineering Activity includes a short video that shows Pacific coast erosion damage that affects many homes and towns that are near water. Learning about coastal erosion will help students understand the engineer’s role in protecting our shorelines. Students are asked to devise a plan to help an imaginary town of Oceanside manage a soil erosion problem. Using the wave tank and materials they are provided, students will work in groups to adjust the beach to reduce as much sand erosion as possible. This challenge is also to include two policies that regulate human behavior and do not physically change the shoreline.
How To
(Safety Note: Clean up splashes as soon as possible to prevent slipping.)
A. Explain the scenario:
- Each group act as a coastal management engineering firm competing with other groups in class to win a contract from a town called Oceanside.
- Oceanside’s sandy beaches have been eroding over the past few years. Each firm must create a plan that will help the town handle its problem with erosion.
- Plans must include changing the beach in a way that addresses erosion concerns and at least two policies that regulate human behavior instead of physically changing the shoreline.
- Explain that each stakeholder will vote on their ideas.
- Students must find a balance for their competing interests to win the contract.
- Depending on the time you have with this activity, you may also give students additional criteria to think about, such as a specific budget.
B. Start a discussion with the class to come up with what it takes to have an effective engineering plan on controlling beach erosion, which concerns all of the stakeholders.
Show the following erosion criteria to consider:
- The height, width, and shape of the coastline
- The amount of sand pulled out to sea
- How far the waves reach up the shore
Ask which of the criteria they will measure and how they will measure it.
C. Have students use a wave tank to develop and fine-tune their coastal management strategies:
- Before the activity, wash the sand and rocks to remove fine particles that will make the tank water muddy.
- Fill the tank one-third full of water. All groups should have the same height of water.
- Generate waves using a paddle or other object. All groups should generate waves using the same object, having similar amplitudes and frequencies. Use a metronome to harmonize wave frequency (You can find free metronome apps for smartphones in iTunes or the Play Store).
- Pour sand into one end of the tank to create a beach, making sure that a portion of the sand goes above the waterline. Make as many variables as possible equal between groups using the following factors: the total amount of sand, the height of the beach, the width of the beach, the location of the endangered crab habitat marked with toothpicks, and the number and location of the houses.
D. Collect control data in one of the tanks to represent what will happen if nothing was done to the beach:
- Mark the shoreline with toothpicks
- Take “before” pictures of the wave tank profile and shoreline top view, measuring things that correspond to the beach erosion criteria (e.g., beach height).
- Generate waves for 5 minutes, with consistent amplitude and frequency.
- Observe the wave patterns that are created and take pictures of them.
- Take “after” pictures of the wave tank profile and shoreline top view at the end of the trial.
- To observe shoreline changes, compare the current waterline location with the location of the toothpicks.
- Measure things that correspond to the beach erosion criteria (e.g., beach height)
E. Have the students develop their management plan for shoreline modifications:
- Have students choose a name for their coastal management engineering firm.
- In their groups, ask them to discuss ideas for managing Oceanside’s erosion problems. They might consider several approaches in their plan to alter the shoreline, including building hard structures or stabilizing the shore with “soft” non-structural techniques like moving sand around or planting vegetation.
- Have them test their fundamental ideas in the wave tank following. During this time, while you are developing and improving solutions, you may choose not to follow all of the steps, or you may generate waves for less time than suggested.
- Collect final “before” and “after” data on your design plan by following all of the steps in Part D. The data they collect will be used in their presentation to stakeholders.
- When cleaning up, have students spread out the sand in a pan in the sun to dry out before storing it.
- Analyze and interpret the data.
Science Content
This STEM activity for fifth graders aligns with two NGSS science and engineering practices:
4-ESS3-2: “Generate and compare multiple solutions to reduce the impacts of natural Earth processes on humans.”
3-5-ETS1-2: “Generate and compare multiple possible solutions to a problem based on how well each is likely to meet the criteria and constraints of the problem.”
Engineering Content
This STEM activity for fifth graders uses the Engineering Design Process to challenge students to manage problems with erosion. To simulate wave erosion, they use a wave tank and then as a group decide the best way to control erosion on the beach with materials provided to them. Students work in groups to plan and then draw their wave tank before setting up standardized wave tanks. Students decide the criteria they measure ahead of time. They measure the heights, width, and the overall shape of the coastline, and the amount of sand pulled out to sea.
What to Say and Ask
- Compare your “before” and “after” data. How much did the shoreline change?
- Compare your “after” data to the “control” data collected in Part D. How did your plan compare?
- Analyze your “before” and “after” pictures to determine the difference in the beach area.
- How well do you think the wave tank modeled engineering designs in the real world?
- How could the model be improved?
- Were there things you could have done differently to improve your design?
- Compare your proposed solution to other groups. How were different group proposals similar? How were they different? Which plan do you think met the stakeholder’s needs best? Why?
- What policies did people suggest, go over well? What policies met with resistance? Why?
- What were the limitations of your proposal?
- How do breakwaters, jetties, seawalls, and other hard structures affect sand transport? What is the negative side of using these structures?
- How do natural ways of stabilizing the shoreline, such as restoring native plant habitats, protect the coast?
Source
Levee Protection
Materials
- rectangular plastic container or tub
- scissors, to poke holes in cups
- $10 worth of fun money; strips of paper that each represent one dollar
Levee building materials:
- access to water to test the levees
- small paper cups
- 1 sheet paperboard, such as from a cereal box
- 8-10 plastic drinking straws
- 8-10 Popsicle sticks
- 1 sponge
- 1 plastic sandwich bag or square of Saran® wrap
- 8-10 cotton balls
- about 1 ft of duct tape
- about 2 cups of sand or gravel
Description
In 2005, Hurricane Katrina severely damaged New Orleans. As the ocean water rose from the storm, the levees that surrounded the city could not hold an immense amount.
In this activity, students will use the engineering design process to design and build their own model levees. They will split a plastic container into two parts where one side represents a lake or river, and the other half represents the town in which we want to stay dry. Acting as engineers for their city, students create sturdy barriers using limited materials to prevent water from flooding a city in the event of a hurricane.
Depending on the setting and number of students, you can have students work on their own or in groups.
You can facilitate this activity in one day or split it between two days. Students design their levees on the first day, and on the second day, they build and test them.
How To
Have students use the following design process to design, build, and test their model levee:
- Define the problem by determining what you need to solve, and what your design constraints are.
- Problem: Maintaining the boundary between the lake/river and the city.
- Constraints:
- Size: The real levee’s height must be 5 meters higher than the level of the sea and wide enough to inhibit flooding from the surrounding lake or harbor. Your prototype’s height must be at least 5 inches higher than the water and wide enough to inhibit the water on one side of a plastic container from flooding into the other side.
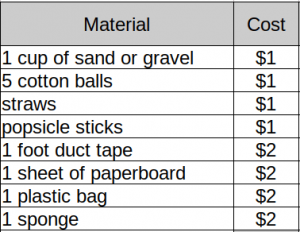
- Budget & Materials: The prototype levee will be built in a plastic container. You are to use $10 of fun money given to you to purchase levee supplies. You may only buy from the following list of approved materials:
- Gather information by researching and performing experiments that help you build your design — research how real levees are constructed and write it down. Next, test how at least two of the approved materials slow down water. To do this, poke a small hole at the bottom of a cup and put your test material over it. Then pour a specifically measured amount of water into the cup and observe how well the material absorbs the water. Write your observations down for each material.
- Brainstorm ideas by being open to as many creative ideas as possible. Discuss ideas for how to build your levee then write down and/or sketch every suggested idea.
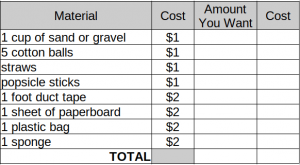
- Select the most promising concept by reading through your ideas again, then choosing the one that you think will work best. Describe and/or sketch your idea. Determine how you will spend your budget on materials by using the following table:
- Purchase your materials and use them to build your levee prototype. Then, test it out by pouring water into one side of your container.
- Evaluate your design by thinking about how well it worked. This helps you make changes to improve the final, real version. This is the same process real engineers go through when evaluating their real-life designs.
Science Content
This STEM activity for fifth graders aligns with two Next Generation Science Standards:
3-ESS3-1: “Make a claim about the merit of a design solution that reduces the impacts of a weather-related hazard.”
3-5-ETS1-1: “Define a simple design problem reflecting a need or a want that includes specified criteria for success and constraints on materials, time, or cost.”
Engineering Content
Civil engineers design the roads we drive on, the water systems that bring us fresh water that we drink and bathe with, and sewage systems that carry away our waste. Without civil engineers, we wouldn’t have these things that support the needs of people living together.
In coastal areas, civil engineers have an essential role in protecting people from natural hazards, like hurricanes. Levees, floodwalls, pump systems, and canals are designed and built by them to prevent flooding. When failure happens with these designs, engineers evaluate what happened and why then redesign and make improvements.
What to Say and Ask
- What happened when you tested your levee?
- What did you like best about your levee system design?
- If you were to rebuild it, what changes would you make?
Source
https://www.teachengineering.org/activities/view/cub_weather_lesson05_activity1